Image from Aptgadget
With the whole world going online for the past year we have seen the rise of Amazon one day shipping, an annoying online meeting app called something like Zuum and to my biggest surprise – Discord.
Yeah, the number of Discord servers I’m on has doubled since the start of the quarantine but even more curious is that most of these new servers are completely unrelated to gaming, which goes against Discord’s spirit of a “gamer-oriented” platform.
With the “gaming” features out of the picture, I started to dread this great platform because it got as boring as a Microsoft Teams group. I needed to make something to bring back some of the fun and maybe make a server more casual.
The solution to such a lack of functionality was clearly building a Discord Bot to do what I wanted. To my surprise, it was one of my best experiences setting up a bot and working with an API. Even better, the transition from a prototype to a fully working always-on bot was seamless and really simple with minimum Python knowledge.
For this project, I kept it simple with a bot that is going to give me a random YouTube video on command to satiate my procrastination thirst while waiting for my friends to join the voice chat.
You can check out what I came up with on my GitHub and read on to find out how can you set up your own Discord Bot.
Setting up Discord
Before we plug-in our python code, we need to let Discord know we intend to build a bot so we can get an API key. This way Discord will be able to identify our bot and let it access data and interact with other users.
Second, we need a Discord server to do all the testing on.
Create a Discord server
If you are reading this, you probably have a Discord server already. If you don’t, create an account here and download the desktop app from this page.
In the Desktop app, look for the “Add server” button in the left sidebar and follow the instructions to create a sever.
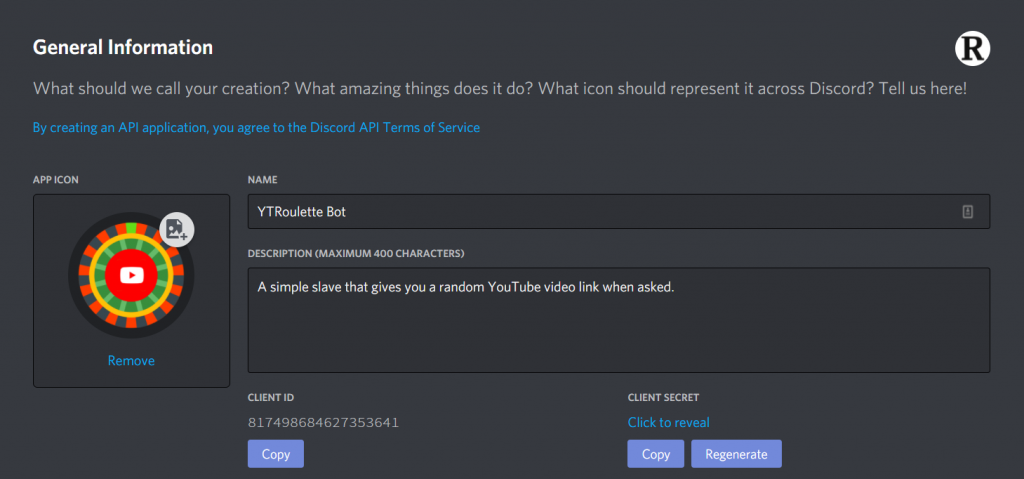
Register your bot
Go to Discord’s Developer page. Create a New Application:

Don’t worry, the name you choose now can be changed later.
I took a moment to Photoshop a logo and write a fitting description for the future bot.
On to the creation of the actual bot…
In the Bot tab on the left create a new bot. If you make no changes, it will copy everything from the Application.

Now we have a Token for our bot. This is the password for our bot so you better don’t reveal it to anyone. If anything goes wrong you can always regenerate a new Token without breaking anything in your program.
Add the bot to the server
To add the bot to our server, we need an authentication link that will also tell Discord what permissions to grant our bot. In the OAuth2 tab, you can generate such a link.

For development purposes, you can just check the Administrator rights but in the final product try to use as few permissions as possible.
Finally, paste the link in the browser, select the server you want to add the bot to, and “Authorize” the bot.
Now we have a registered bot and can deal with coding and testing our Python code for it.
Code the Python script
For our bot, the python script has 2 main blocks of code. One responsible for connecting to the Discord API that manages the bot actions and another one that handles the bot actions when a certain command is issued – in our case to deliver a random YouTube video.
Starting the Discord bot
When dealing with APIs you want to keep your tokes outside the code so no one can see them. For this bot, I went with a .env file. The good thing about this is that .env is an invisible file to git (if you don’t specifically add it) and the cloud environment we are going to use later.
Install the package:
pip3 install python-dotenvAnd create the file .env:
touch .envIn the created file add the variable for the Discord token from the Bot tab in your browser. A fancy way to do it in the terminal is using the echo command:
echo “DISCORD_TOKEN=[Paste the copied token from browser]” >> .envOf course, you can use any text editor instead.
In randomYT.py we’ll use the discord.py library to connect to the API.
pip3 install discord.pyimport os
import discord
from dotenv import load_dotenv
# Getting the Discord Token from the .env file
load_dotenv()
TOKEN = os.getenv('DISCORD_TOKEN')
# Loading the client
client = discord.Client()
# Print message in command line when connected
@client.event
async def on_ready():
print(f'{client.user} has connected to Discord!')
# Run the bot client
client.run(TOKEN)Now you can run your code and start your bot.
python3 randomYT.pyNow our bot is online! At least while the program is running in the terminal… for now.
Getting a random YouTube video URL
For this part, my initial thought was to use the YouTube API but there’s no good way to get a random video without keeping a huge list of random search results and then pick one from there.
Another experiment was trying to generate random video ids for YouTube videos and see which one exists. An id is made of a combination of 11 characters – letters, numbers, “-” and “_” so that was fundamentally a bad idea. There are billions of possible combinations and I couldn’t generate an existing id in reasonable amounts of time.
The solution I ended up going for was making an HTTP request to https://random-ize.com/random-youtube that does all the heavy lifting and returns random YouTube videos. Then, using Python, I extracted the URL from the HTML of the webpage.
We will use the requests library to get the HTML code of the website and then use the Beautiful Soup library to clean it all up.
First, install the libraries:
pip3 install bs4Next, let’s have a look at the HTML of the webpage we are going to parse.
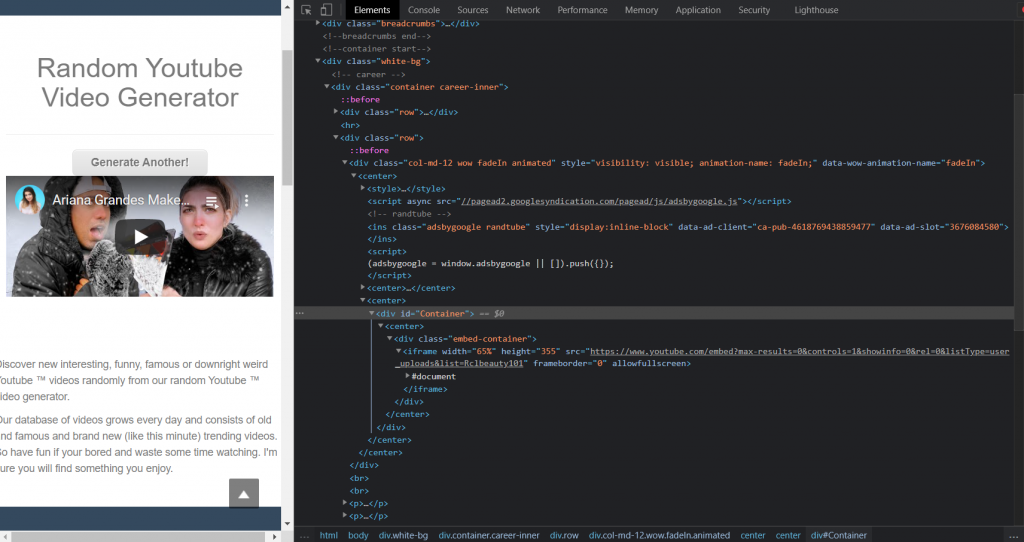
All ids in HTML are unique so we can use the id attribute of the div element to identify the block we are interested in. Then we take the iframe element and extract the src attribute. Following the link from src, we are sent to a webpage with only the video and a single “a” tag that contains the URL to the youtube video.
We do all this in this block:
# Request a video and parse the first link from the HTML
url = "https://random-ize.com/random-youtube"
html_text = requests.get(url, headers=headers).text
soup = BeautifulSoup(html_text, 'html.parser')
url2 = soup.find(id='Container').find('iframe').attrs['src']

# Follow the link and parse the clean YT video link
html_text = requests.get(url2, headers=headers).text
soup = BeautifulSoup(html_text, 'html.parser')
yt_url = soup.find('a').attrs['href']
Our requests need a header to be identified by the website. I added a random one at the top of randomYT.py before the lines above are executed.
headers = {
    'User-Agent': 'Mozilla/5.0 (Macintosh; Intel Mac OS X 10.12; rv:55.0) Gecko/20100101 Firefox/55.0',
}
Finally, this line writes the result in the Discord Chat when the !ytroll command is written in chat.
await message.channel.send(yt_url)The while-try structure these blocks are wrapped in the final version makes sure the program will try getting a new video if it fails at some point.
All this is inside on_message function from the DIscord API that checks the messages in the chat.
Add a help command
Every proper bot needs to have a help command for the user to see all the available options.
Make the command distinct so it is not triggered by mistake or triggers the help of another bot.
if message.content == "!ythelp":
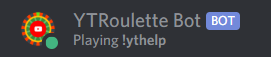
await message.channel.send("Commands available:\n!ytroll - spit out a random YouTube video")To tell the user this is the help command, we add it as a game tag when the bot is initialized in on_ready:
@client.event
async def on_ready():
    await client.change_presence(activity=discord.Game('!ythelp'))
    print(f'{client.user} has connected to Discord!')
The bot will look like this now…
A small extra
A good precaution when working with the bot is to add a small check-in on_message that verifies that the message is not sent by the bot. Sometimes, without this line, the bot can get stuck in an infinite loop of triggering itself.
if message.author == client.user:
        return
Making the bot work 24/7
Now that our bot is working properly let’s make it work non-stop. For this, we are hosting the code on a free cloud machine with repl.it.
Repl.it stops the machine when you close the tab with your project but if you have a server running it is going to stay up for an hour.
Knowing this, we will start a Flask server with our program (don’t worry it’s really simple) and use uptimerobot to ping it every 5 minutes, thus keeping the virtual machine running 24/7 for free.
Setting up repl.it
Create a repl.it account and make a new blank project to add the project files to or import a GitHub repository with the bot files.
Create the .env file from scratch as it is pretty annoying to deal with and it has just one line.
You can use the “Console” tab to make any manipulations in the terminal and install the packages we discussed earlier (there is a list with all the packages already installed in the Packages tab on the left sidebar).
Add the flask package we are going to start a server with.
pip3 install flaskGoing forward, your package list in repl.it should look like this:

Adding the Flask server
We’ll use this Python code in stayup.py to start a Flask server:
from flask import Flask
from threading import Thread

#Starting a Flask server on 0.0.0.0:8080
app = Flask('')

@app.route('/')
def home():
    return "Hello. I am alive!"

def run():
    app.run(host='0.0.0.0',port=8080)

def keep_alive():
    t = Thread(target=run)
    t.start()
What is happening here is beyond the scope of this guide but all you need to know is that this code will start a webpage with the text “Hello, I am alive!” and a long HTTPS link.
To use the keep_up function we need to import stayup.
from stayup import keep_aliveAnd add keep_alive() at the very start of randomYT.py
The cool part about the script is that you can easily reuse it in any of your future projects by just importing it and calling keep_up.
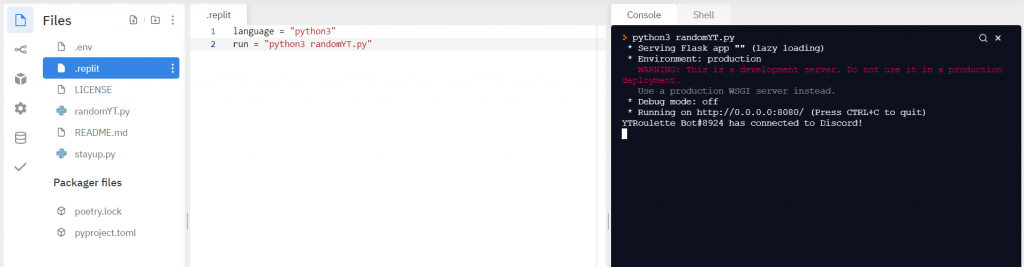
Finally, to start our code we have to add python3 randomYT.py to the run variable in the .replit file and voila – Press the “Run” button at the top of the page and witness the magic happen!
If you refresh the page you will also see the webpage running.

Keeping the server up
Create an account on uptimerobot.
In your dashboard press “Add a new monitor” and complete the fields. For the URL field use the one from the repl.it server.

Now the server will be pinged every 5 minutes so the Flask server won’t be closed by repl.it, keeping our bot always on!
P.S. Make sure to keep the ping time less than 60 minutes!
Conclusion
Now you have a full-fledged Discord bot! Feel free to test it on your server before sharing the OAuth2 link with the world. I “tested” 2 hours of cat videos and Vine compilations with no issues.
The discord.py library has a bunch of more commands and activities you can learn more about in their documentation.
Happy coding and a good day!